
In light of… current events occuring south of Canada, I felt it was prudent to start doing more work on things like wireless mesh networking. As such, I wanted to work on getting my first Meshtastic (or meshcore, but we’ll do meshtastic for now) node setup to get some coverage for my neighbourhood.
This will be the first of a number of blog posts around setting up Meshtastic, testing Meshcore, and some security testing around the mesh implementation in these devices. I have an SDR on the way, so followup work will look at encryption and how these devices communicate (and how secure it is or isn’t, especially compared to something like Signal).
Obviously standard reasonably OPSEC rules apply for something like this; don’t say anything over a wireless device that you wouldn’t be comfortable saying out loud in say, a crowded restaurant. But it does give at least a fallback communications method, assuming you have people you trust or care about also using it — in case, say, a cellular network that rhymes with Dodgers jyst fuckin’ disappears when you’re heading out on a roadtrip for a weekend bachelor party. Not that I would know anything about that.
What’s Meshtastic?
Meshtastic is a firmware developed for a number of small, low-power wireless ICs that a number of projects have taken to using as the core of various wireless projects. In the case of the Heltec V3 we will be using for our setup, this is an ESP32 SoC which supports wifi, bluetooth, and 902-928MHz, the acceptable use band for North America.
One might note this is also the frequency range of civilian drones such as DJI drones and there are certain other activities in other parts of the world that might be interested in say, detecting or jamming this frequency band. This is a discussion for another time when we’re looking into the wireless implementation; let’s get back to that in a couple of weeks.
The meshtastic project is implemented as a firmware you install on a given LoRa (low power long range) communication device, which then either implements a messaging system itself the lilygo t-deck) or pairs with a mobile phone to facilitate messaging (which is what we’ll be doing). This then allows the user to send simple messages, and location data, encrypted, over a mesh network to other users.
Naturally this means the mesh network requires users who have setup nodes with sufficient range to create a web of connected devices that are able to pass these messages along to the intended target. This is similar to how data is routed over the internet, you can think of meshtastic nodes are routers (in the literal networking sense, like a Cisco router running iOS; think CCNA). It is worth noting that Meshtastic does not maintain a routing tableor implement something like BGP, it’s a flood system. That has…. implications for use in dense high-traffic environments, but we’ll get to that in the future when we talk wireless and the messaging stack.
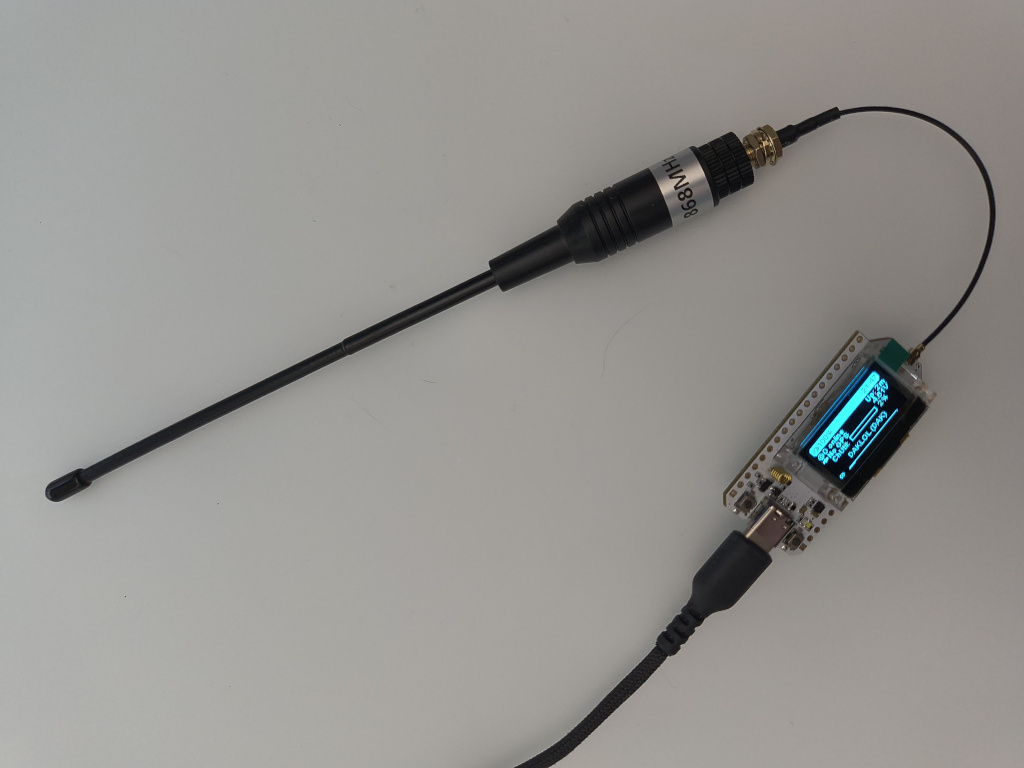
You will notice my antenna is a-hem, a little larger than the one you would have received with the kit. This is because I ordered a longer whip for range once I move it outside. Since I am the only local node, I want to give it a fighting chance. They’re real cheap off aliexpress, like $11 CAD shipped; just make sure you get the right frequency range for your region.
Flashing
So this is the scary part for a non-technical user. When you buy a device such as the Heltec V3, it comes with a stock basic firmware for the device you purchased, not a meshtastic implementation. You must go out on the interwebs and get the firmware yourself, and flash it to the device. This is admittedly an easy process, but a scary one.
I will walk through this process with specific links, so that someone can simply step by step follow the instructions and do this, so that no technical knowledge is required.
Assuming one has purchased a Heltec V3 so that this is a step by step guide from somewhere like amazon you will receive the device, an antenna, and pins to allow you to use the GPIO pins (which we will not be utilizing now). Then you must connect it to your computer (this does unfortunately require a computer) with a data-capable USB-C cable.
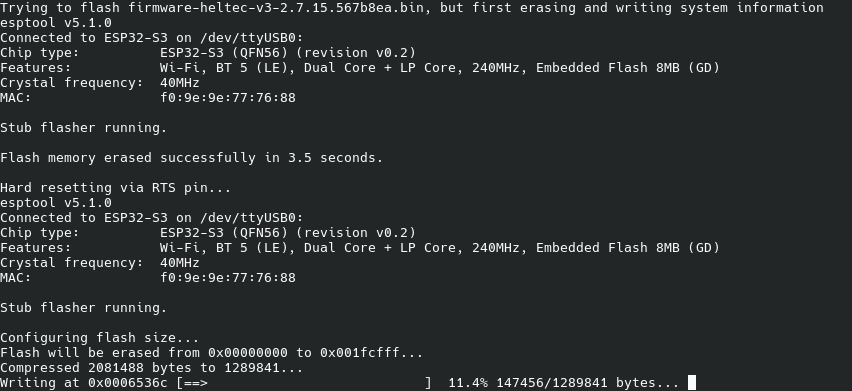
Navigate to the following URL and download the firmare-esp32s3-* zip file from the latest release: https://github.com/meshtastic/firmware/releases This is the correct firmware for the Heltec V3.
Unzip this file, I will be using linux, but you will run the appropriate command on your windows terminal.
Navigate to the folder you unzipped the files to in a terminal, ie cd ~/Downloads/firmware-esp32s3
./device-install.sh -f firmware-heltec-v3-2.7.15.567b8ea.bin
or in the case of windows
./device-install.sh -f firmware-heltec-v3-2.7.15.567b8ea.bin
This is in the case of having version 3.2.7.15 which is the latest at time of writing. You can use tab completion to select the appropriate latest version.
This will then begin installing the firmware on the device, you may see the device reset a couple of times. Just leave it until the terminal says it’s finished. It’ll take a bit to do its thing.
Long-press the PRG button to hit OK, press it once to select US if you’re in NA, and long press it to select the region. This sets the appropriate frequency band so the FTC doesn’t come mess you up.
Enter the PIN that appears on the screen of the device when you start attempting to pair. Your phone is now paired to your meshtastic node and can be used.
You may want to go into settings > User and change the name of your node — this is what you will be identified as; so I’m changing this node to DAKLOL/DAK, as one does.
That’s it. Other than the next steps of getting a solar setup done, and getting it outside, your node is working and should be able to connect to other nodes. Since I have no friends, and I’m the only node in my area, I can’t actually send a message to anyone, there’s no one to receive it.
I’ll be back with my outdoor setup (some of the snow is going to have to melt first), security, and range testing!
Good trouble. Don’t CS Gas kids. Be safe. DAK out.