
Early this month, on May 2 2026, IGN — a major videogame review and journalism site had their twitch account compromised in a credential leak. Late in the evening on May 2, a self-proclaimed “white-hat hacker” (leveraging leaked credentials is no longer white hat, don’t touch shit you don’t have permission to touch) utilized this leaked restream.io credential to stream on their twitch platform and “inform” the outlet that their credentials were leaked. If you’d like to read about it, I wrote about it here: IGN Twitch Hack: How Leaked Restream.io Credentials Hijacked a Major Media Channel on the Specops Software blog.
While Restream.io is a popular multi-streaming solution, and it does provide a quality service (and combining chats is sweet), it does create a high-value single point of failure for large platforms. Also, what I didn’t realise at time of writing is RTMP streaming is gated behind the business-tier of subscription which means if you want to use any industry strandard streaming software rather than restream’s client, you get to pay the big bucks.
Having built out RTMP infrastructure for various projects in the past (long story, previous employer), I’d rather just run my own and deal with the infrastructure. $5/mo for a Linode is markedly cheaper than $199 USD/mo just to bounce a stream to a couple of platforms. So let’s build our own! Yeah, you admittedly do lose the combined chats, and some other nice features, but if you’re just a rando trying to man up and get more regular streaming/content-creation in, it’s enough. I have multiple monitors, it’s fine.
RTMP Proxying
In order to create our own multi-stream infrastructure, we’re going to be using a protocol called RTMP (Real-Time Messaging Protocol). This is the simplest form of video streaming, but it’s generally secure enough with some work (long secrets that would be a pain in the butt to bruteforce) and is reliable enough. There are more modern and more secure protocols such as SRT that can be used, but we’re going to keep it simple.
To perform this proxy, as may not be a surprise, we’re going to leverage NGINX. NGINX is great for proxying basically anything, and it does in fact also have an rtmp module that we can use.
While it may sound like this would be a computationally heavy process, since I’m recording locally rather than to the linode itself (you can include directives to record to the server, transcode with ffmpeg, and so on), I’ll be using a little basic $5 Linode. This is enough for my purposes, and the bandwidth limit for even the entry Linode is enough for hundreds of hours of bouncing the stream to Twitch and Youtube, so it’s perfectly cromulent for now. We’ll go into that math later.
Setting up the Linode
Log into Lindoe.com or create an account, navigate to Linodes, create a new linode. Set your region in the dropdown to a location near you, in my case I select “CA, Toronto (ca-central)” because I’m maple-flavoured. Create a new 1gb nanode under shared CPU; shared CPU is fine if we’re not doing any transcoding directly on the box, we’re just proxying some video traffic. Select Ubuntu for your distribution, configure the root password and ssh keys if you’re using cert auth (you should) and fire it up.
SSH into your new Linode when it comes up with the credentials (preferably cert auth) and run the following to install the module (which has NGINX as a dependency so it’ll pull in NGINX too):
sudo apt update
sudo apt install libnginx-mod-rtmp
Then open the ports in the firewall:
sudo ufw allow 1935/tcp
sudo ufw allow 80/tcp
sudo ufw allow 8080/tcp
Now that NGINX is installed, we can edit the configuration and setup the proxy. Using vim, we can just edit the config:
vim /etc/nginx/nginx.conf
You can leave the default config and just navigate down to the bottom of the config file and enter the following:
rtmp {
    server {
        listen 1935; # Standard RTMP port
        chunk_size 4096;

        # This can be a unique string, and should be, as long as a UUID, as this will hide the endpoint
        application live {
            live on;
            record off;

            # Push to Twitch (Replace with your actual stream key)
            push rtmp://live.twitch.tv/app/<key>

            # Push to youtube
            push rtmp://a.rtmp.youtube.com/live2/<key>

            # Whitelist your IP
            allow publish <your external IP>;
        }
    }
}
This sets up nginx to listen on the RTMP port, names the endpoint (preferably something unique), configures the pushes to youtube and twitch (or any other RTMP service, you just need to look up the URL and stream key), and whitelists my IP so only my home network can stream, even if someone found the endpoint.
RTMP is a simple service, and does not support authentication out of the box, it is protected via whitelisting, blacklisting, and naming the endpoint. Other security methods are outside of the scope of this writeup.
Once you save the config you can exit vim with :wq and restart nginx:
systemctl reload nginx
Configuring OBS
While any standard streaming software will work (OBS, Streamlabs OBS, Meld, VMix), we’ll discuss OBS here, since that’s what I prefer to use. We’ll walk through not only how to setup OBS to stream to this endpoint, but I’ll also cover what my setup actually looks like right now as an example.
Now that we have the Linode configured, we just need to configure OBS to stream to it, rather than directly to twitch; this is pretty straightforward if you’ve streamed with OBS before.
Launch OBS, navigate to Settings > Stream, select custom from the dropdown and enter https://
Stream away, NGINX will automatically bounce the stream to the configured services, and twitch automatically detects that there’s a stream being pushed and goes live. Youtube you do need to jump through their hoops to start the encoder; both will require you to set your stream title in the creator dashboard anyways, so it’s not the end of the world. Just set your stream info, fire up the encoder for Youtube, and you’re off to the races.
My Setup
I’m going to go through my setup briefly, to better display the kinds of things you can do with this; on the basic end you can just bounce a stream from OBS to the other services — I’ve made mine a tad more complicated than that. Why do something if you’re not going to overkill and add a tonne of tech debt? We’re nerds right? The tech debt is part of the adventure, lol.
This is the diagram of what my setup looks like right now:
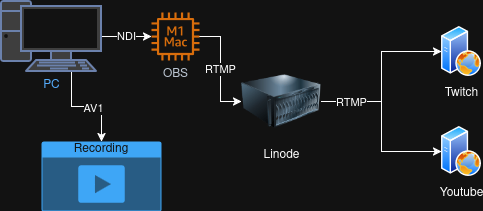
So in my office I have a ubiquiti switch on a lack rack with my audio gear and other junk like my MISTer on a rack mount shelf. So any traffic between my desktop and the mac just hops across the switch, so I don’t need to worry about saturating our backbone or any other infrastructure with traffic if I get silly. This is where NDI comes in.
NDI is a protocol used for transmitting high definition video (lossless) over a network. It is used in professional productions to pipe lossless footage from cameras across the network for processing at a video workstation, think: feeding footage from cameras across a network to a command centre where cameras can be switched, footage can be recorded, and so on, as part of a video production. This is often used in things like churches to run their service broadcasts. It uses a lot of bandwidth, hundreds of megabits, but it’s lossless, and takes effectively no overhead to push from an OBS instance that’s producing gameplay and taking cameras and audio devices in, it’s great.
So this goes across the network from my desktop to a Mac Mini. This Mac Mini is then configured to push this as an encoded stream up to the Linode where it’s RMTP proxied to the streaming services. Currently what this looks like is, a 5120x1440p canvas on my desktop with the gameplay/primary footage side-by-side with a full res of my facecam. This is cropped down to 2560x1440 for the primary scene, to stream out.
So hit stream on the mac, this fires what it’s getting over NDI out to the RTMP proxy. Hit Record locally to encode a 17mbit AV1 copy of the entire canvas for future editing (using an Intel Arc A770, great AV1 encoder) into shorts or other content.
It’s absolute overkill but anything worth doing is worth doing excessively.
I’ll talk more about how this evolves over time, but for now it’s working really well.
Conclusion
As an alternative to an expensive business restream.io subscription, it’s pretty straight forward with a little know-how to setup your own RTMP proxy to mirror your content to other platforms. It requires a little learning of the linux commandline (terminal) and some education in how streams work, but it’s good practise for developing other content or working with other video setups.
Give it a go, make something, and have fun. Catch you in the next one.